
Grow potatoes
For those new to vegetable gardening potatoes are a great crop to begin with. Planting starts in mid-winter with the early varieties arriving in garden centres in June and continues through spring. We checked in with three experienced potato growers for some timely inspiration.
In Taranaki, Steve Linn and his wife Jo grow all the fruit and vegetables they need - and more - in their large country garden. Steve grows potatoes for the sheer joy of it, and to save money. “Our potato and kumara crops are a valuable food source throughout the year because they’re a good crop to store,” he says.
They’ve experimented with a range of different varieties over the years. “We usually put two varieties in each time. We generally stick to the ones we know but for a second variety we sometimes try something new. “We like good all-rounders such as Nadine and Desiree. Jersey Bennes are a good Christmas crop and are nice to have boiled with mint and eaten along with a salad.”
Steve says his rich volcanic soil is naturally fertile and great for growing potatoes. “Some years I will add pig manure, dig it over and let the soil sit for a few weeks before planting,” he says. “Other years I add potato fertiliser before planting. I don’t do much once they are in the ground, apart from weeding and mounding the soil.”
Pests and diseases? “So far, touch wood, we have been lucky and haven’t had blight yet. We have had the odd black spot, but it has not affected the whole crop.” It helps that they have room to change the location of their crop each year.
At harvest time, Steve says he cuts off the green tops of the potatoes after flowering. He then uses a large garden fork to loosen the soil around the rows so he can carefully lift them up without piercing them.
Once they’re dry, he stores his main crop potatoes in a 200L plastic barrel cut in half with holes drilled all around the sides for ventilation. The potatoes are spread between layers of newspaper and kept through winter in a cool shed. “Don’t store your potatoes near onions as it can make the potatoes sprout,” he reminds us.
Steve and Jo enjoy all sorts of potato dishes; salad, scalloped, and baked as wedges. Steve’s current favourite is “boiled with some onion and then mashed all together with butter and milk”.
In Katikati, Anne Billing likes to grow Jersey Bennes for summer and versatile Agria for storing and eating over winter. As a treat she recommends; “Agrias double baked and stuffed with goat’s feta and smoked salmon. But comfort food is mashed potatoes with gravy!”
She buys her seed potatoes as soon as they become available in winter, chits them, then tries to get them in the ground in June. “Psyllid is a problem here in Western Bay of Plenty, which is one of the reasons I like to get my potatoes in early,” she explains. “If I get them planted in June, I can start eating my Jersey Bennes early and get my Agria out of the ground by end of December.”
Anne’s soil preparation involves compost, chicken poo, EM (effective microorganisms) and comfrey. “I dig a trench, put dwarf comfrey in the bottom, then put in the seed potatoes and cover. Once I’ve mounded them, I leave them to their own devices, but it’s important to keep the weeds down so potatoes don’t have competition for nutrients.”
At harvest time Anne starts at the end of the row and digs wider than the original trench. “I still manage to get some with the spade!” Before storing she leaves her freshly dug Agria potatoes on the porch, covered with a hessian sack for a few days to dry the soil, then “I store them in the pantry covered with newspaper. What won’t fit in the pantry I store in a vermin proof cupboard in the garage, always covered from the light.”
In Canterbury, Grant Dawe of Morton Smith-Dawe grows seed potatoes (as well as yams, asparagus, garlic, and shallots) for gardeners throughout New Zealand. He’s been involved in potato growing since childhood when he helped in the family business.
At home, Grant trials the potato varieties he supplies his customers. “Haylo is what I eat most days,” he reveals. He rates this home garden favourite as one of the best for flavour, adding, “I also grow Haylo because we can eat it both early and late and it holds extremely well. We dug the last of the crop in April and we are still eating it now.” Bred at Plant and Food Research, Lincoln, Haylo is named after Grant's niece Haylee.
For December eating, Grant plants his early potatoes around mid-September. He also recommends Liseta. Purple Heart, also bred at Lincoln, is a good one to grow for its antioxidant content, and it keeps its colour when cooked.
Grant recommends adding fertiliser at planting time, but he cautions against being too heavy handed. “If the recommended rate is 15g per potato and you add 30g, you will end up with less spuds,” he says. “Make sure any animal manure is properly composted and use it sparingly to avoid scabbing.”
He agrees that earlier planting in warmer North Island climates is a good idea if you have a psyllid problem in your region. “In the South Island this pest doesn’t arrive until December or early January, but there is no point in spraying once the pest has arrived. It’s important to take preventative action,” he advises. Covering with horticultural mesh will prevent the adult psyllid laying its eggs on the leaves, but it must be fine enough to block the tiny insect and be completely sealed around the edges. Grant recommends burying the edges in the soil.
Another way to prevent psyllid damage, he says, is to cut off the tops once your potatoes have reached full size. “The soil can be the best place to store your potatoes, provided it is not too wet or dry. And of course, you need to lift them before frost,” he reminds us.
HOW TO GROW POTATOES
- Start with quality! Purchase certified seed potatoes. These are guaranteed to be true to type, free of disease and more reliable than those saved from the previous year or bought at the supermarket.
- Sprouting for success. Pre-sprouting your tubers (seed potatoes) gives stronger growth after planting. Place them in a dry airy place (not a dark cupboard), until sprouts are 1-2cm in length.
- Planting. Potatoes need full sun and well-drained fertile soil. They need not be planted in rows, but the traditional trench makes for easy management. To avoid burning young shoots, apply fertiliser or manure below the level of the tubers; make a planting hole or 15-20cm deep, add your fertiliser and then cover with 5cm of soil before placing the seed potatoes on top. Space the tubers about 25cm apart with the sprouts pointing upwards and cover carefully with soil.
- While they grow. When the plants reach about 10cm in height, start mounding the soil around the stems. Keep mounding as the plant grows (leaving the top half of foliage uncovered) to protect the potatoes from greening and insects. Water regularly to keep the soil moist. Remove any weeds.
- Harvest. For early potatoes, make a note on the calendar for your expected harvest date. Not all varieties produce flowers, but flowering is a good sign that some baby potatoes will be ready to eat. For main crops you plan to store, let the plants die right back before lifting. This allows the skins to strengthen for long keeping.
HINT: Take care to add fertiliser at the recommended rate, not too much or you risk poor quality and reduced yield.
GROWING POTATOES IN A BAG
Where space is limited or there’s no dirt to dig, you can grow potatoes in a bag. Planter bags with handles for easy lifting are ideal, but practically any large (30-40L capacity) container will do, if it has drainage holes.
- Fill approximately one-third of your bag with planting mix or 50/50 blend of soil and compost. Then roll down the sides of the bag. Note: potatoes prefer neutral to acid conditions, so avoid composts with lime added.
- Place one seed potato on top then cover with about 5cm of planting mix.
- Lightly sprinkle with potato fertiliser. Note: Nutrient leaches quickly from containers, so apply fertiliser once a month to maintain healthy, vigorous growth.
- Place the bag in a warm sunny spot. In cold weather you may have to cover or move it to a sheltered spot to protect it from frosts.
- Water to keep the planting mix moist (but not soaking wet).
- As the potato plant grows, top up the bag with planting mix, leaving about 5cm of the plant exposed, until the bag is full. Roll up the sides of the bag as you go.
- At harvest time, simply tip the whole planter upside down.
WHICH POTATOES FOR YOU?
The potato varieties you choose to grow in your garden may come down to the ones you have found to perform best in your soil and climate, the varieties Grandpa grew or simply how you like to eat them.
- For boiling and salads, potatoes with a smooth ‘waxy’ texture are best. Most of the early, new season potatoes are waxy, due to their high water content and low starch.
- For chips and wedges - crispy on the outside and soft in the middle or mashing, plant a variety with a ‘floury’ texture. Floury potatoes are low in water and high in starch. The most famous of these is Agria.
- Some varieties are ‘all-rounders’. Not too floury and not too waxy, they are adaptable to any type of cooking. New Haylo is a fantastic all-rounder, ready for harvest 80-90 days after planting and great boiled, mashed or baked.
- Texture and flavour are influenced by climate and can change as the crop matures. For example, Ilam Hardy is waxy if eaten early in the season, and more floury towards the end.
EARLY CROP
Plant these early to enjoy a pre-Christmas crop:
- Jersey Bennes - An old English favourite, ready to eat 80-90 days after planting.
- Cliffs Kidney - A white kidney shaped potato with superb flavour, ready to eat 80-90 days after planting.
- Liesta - Known for it’s high yields and firm waxy texture, ready to eat in 70-80 days.
- Rocket - Super quick, ready to eat in 60-70 days.
EARLY / MAIN CROP
Harvest these early as ‘new' potatoes or grow to full maturity:
- Haylo - An excellent new all-rounder with white skin and golden flesh, ready 80-90 days after planting.
- Nadine - A white, waxy potato, excellent for boiling. Needs good moisture to grow well.
- Ilam Hardy - A popular high yielding potato that can be eaten early or grown as a main crop.
- Purple Heart - Strong in antioxidants with deep purple skin and purple toned flesh.
MAIN CROP
Plant these in spring and harvest when the tops die down for storing and eating over winter:
- Agria - This is high yielding favourite produces long creamy yellow tubers loved for roasting and mashing.
- Rua - This much-loved NZ bred potato from the 60’s is very versatile in the kitchen and has a great storage life.
- Desiree - A quick grower with attractive pink skin, yellow flesh and a distinctive flavour. Good resistance to drought and disease and useful for all methods of cooking.
- Moonlight - This large versatile potato produces high yields and is a good keeper.
Maori potatoes (Taewa)
Grown in Aoteroa for over 200 years, these heritage varieties are easy to grow in all parts of the country. Harvest 110-130 days after planting:
- Moemoe - Light purple skin and cream flesh, holds it shape well when boiled and keeps well in storage.
- Urenika - Rich in antioxidants with purple skin and flesh, this yam-textured tuber is perfect for baking.
- Whataroa - Purple skin and creamy-purple flesh, it’s great for wedges and chips.
Proudly sponsored by Morton Smith-Dawe
For more information contact mortonsmith_dawe@xtra.co.nz

15-Jun-2023

Chitting potato seed
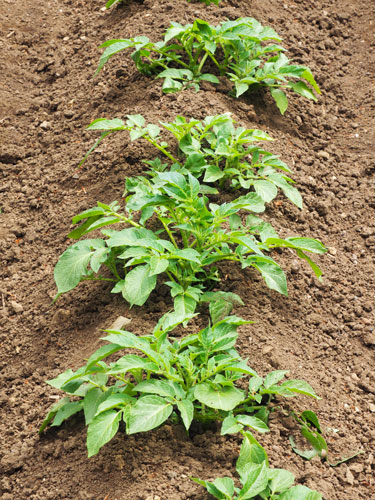
Potato rows mounded with soil
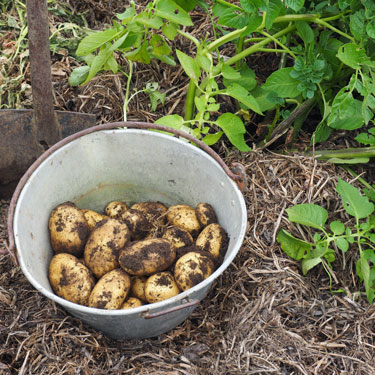
Freshly dug
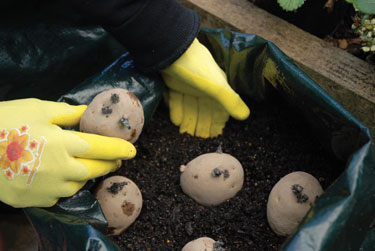
Planting seed potatoes in a grow bag
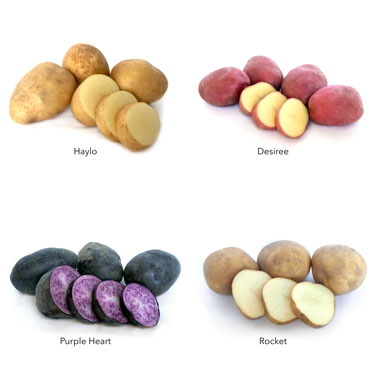
Modern potato varieties
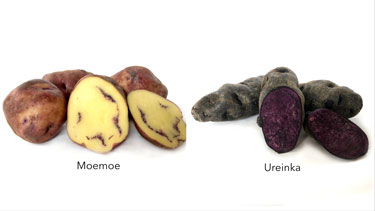
Maori potato varieties
How To
