Grow early veges and strawberries
New potatoes
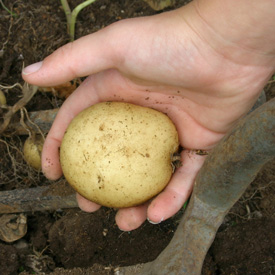
Sweet, wispy skinned and mouth-wateringly waxy, new potatoes are a real summer highlight. Plant them by mid-September and you can be digging up your own tasty little tubers on Christmas morning.
Potatoes are fun to grow. When space is limited they can be grown in a large container or bag. Even a single potato plant is rewarding to grow. The planting season extends from mid-winter into early summer. ‘Early’ varieties are meant for eating straight from the garden. They’re ready for digging within 110 days of planting, and in some warm climate gardens, they’ll be well on their way to a spring harvest. Varieties harvested later, and that are good for storing are known as ‘main crop’.
Early potatoes to plants in spring
- Swift
- Rocket
- Cliff’s Kidney
- Jersey Benne
- Maris Anchor
- Ilam Hardy
Ground rules
Growing spuds the old fashioned way – in garden soil, means you can grow even more. All year round if your climate is frost free.
Crop rotation is key if you want to avoid disease problems. If you want to grow potatoes every year you need three sunny plots as potatoes should not be planted where there has been a crop of potatoes (or tomatoes) within the last two years.
Soil preparations
Potatoes grow best in full sun with a fertile soil that’s light, loose, well-drained and moisture-retentive. Dig deeply before planting, removing any weeds and mix in plenty of compost. A balanced general garden or specialised potato fertiliser should also be mixed in before planting.
Well-rotted animal manure, blood and bone and other organic materials help promote high yeilds. However, to avoid the risk of potato scab these should be mixed into the soil below the seed potato, where it will feed the roots without touching the newly forming potatoes. If you have it, a layer of comfrey leaves below the seed potatoes provides valuable potassium.
Spacing
Traditionally potatoes are grown in rows 60 to 90cm apart, which makes for easy hoeing and mounding. Make a trench about 20cm deep and space tubers about 30cm apart with sprouts pointing upwards. Cover them with about 5-10cm of soil only partly filling the trench. Alternatively, in a small garden it may be preferable to plant in individual mounds. A one metre diameter mound will support about 6-8 plants.
Mounding
Regular hoeing keeps the crop free of weeds. At the same time, the soil should be kept mounded around the stems, because the new crop forms between the seed potato and the surface of the soil. Start mounding the new green shoots when they reach about 20cm tall, leaving the top half uncovered. Repeat every two to three weeks as plants grow, but don't get carried away - if you cover up too much foliage, you may reduce the yield.
Watering
Make sure the soil is kept moist, especially around flowering time as new tubers are forming. To deter disease, wet the soil rather than the foliage and water early in the day so that the foliage has time to dry before evening. To guard against blight spray once a fortnight with copper. Stop watering when the leaves start to die back, a week or two before harvest.
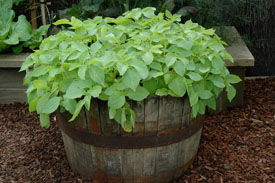
Spuds in a tub
You will need:
A barrel, bag or other container, potting mix or compost, seed potatoes, sheep pellets, fertiliser.
- Choose your container: Provided it has adequate drainage holes, any large bag or container will do. Haxnicks Potato Planters are light and strong, with room for a good crop of tubers and useful handles for lifting.
- Select your seed: Choose an early crop variety to suit your needs. For the best yield, the safest bet is to buy certified seed potatoes from garden centres. Only these can be gauranteed to be disease free, and true to their variety.
- Pre-sprouting: This is not essential later in spring, but until the weather warms up, it is a good way to get a head start and ensure rapid growth after planting. Lay the tubers in shallow trays and place in a light airy room to sprout. In the dark, sprouts grow long and weak, too easily damaged during planting.
- Choose a sunny sheltered spot free from frost: Fill your container with fresh potting mix or well-rotted compost to 10cm deep. Mix in a handful of sheep pellets. Place the seed potatoes with their sprouts facing up. Allow about 15cm between each seed potatoe and 15cm in from the sides of the container. Cover with 10cm of potting mix or compost. (Tip: If planting in a bag, you can roll the top down and roll it back up as the potatoes grow.)
- Water regularly but don’t overdo it. Keep the potting mix evenly moist. In heavy rain, cover to prevent the soil getting too wet and rotting your seed potatoes.
- Add more potting mix once shoots reach 15cm high, leaving about 5cm of the top growth exposed. Repeat this ‘earthing up’ process until with the potting mix until the container is full.
- Feed them well. Nutrients can leach quickly from containers, so it’s worthwhile to top up using a balanced liquid fertiliser, once every few weeks until flowering.
- Harvest when lower leaves turn yellow, usually three to four weeks after flowering began. Tip the bag upside down and unbury your treasure!
Asparagus
Growing asparagus is easier than you may think, but it is all about patience and preparation. It takes three years for a crop to mature from year-old crowns, a year longer from seed. Crowns come available in garden centres from late winter.
Asparagus plants are perennial, which means they crop year after year without needing to be replanted. Spend some time making a deep, well-drained bed of fertile, water retentive soil and you’ll be richly rewarded in the years to come. A mature plant can yield 25 spears per year for 25 years.
Asparagus originates from coastal climates with salty sandy soil, which means it grows best in very free draining soil with a pH of 6.5–7.5. If your soil is heavy clay, acidic or prone to waterlogging, plant in raised beds. You need an open sunny position. Avoid frost pockets as a late spring frost can be damaging.
Ply the soil with loads of compost (at least a bucketful for every square metre) plus well-rotted animal manure or sheep pellets. If the soil seems a little on the heavy side, add some coarse sand. Be sure to remove all trace of weeds, especially perennial weeds.
Give the plants plenty of space. Their roots will spread far and wide. Plant crowns about 45cm apart and allow a good 60cm or more between the crowns and the edge of the bed.
Feed each autumn and spring and keep on top of weeds. Hand weeding is best as asparagus roots grow close to the surface. Mulching with weed-free straw helps block weeds and makes it easier to pull out those that grow. It also maintains healthy soil structure.
During the first two years after planting, do not harvest any of the spears, however tempting it may be! Leaving them to grow is essential to develop a sound root system, the foundation for future crops. When the ferny foliage dies down in autumn it can be trimmed down to about 5cm above the soil. After trimming, add more compost and mulch to the bed.
From seed, expect to wait four years for your first asparagus harvest. On the upside, asparagus seedlings transplant very well. Get them started in pots now and they’ll ready for planting out next spring – giving you plenty of time to prepare a magnificent bed.
Did you know? There are separate male and female asparagus plants. Female plants produce poisonous red berries.
Snow peas
The French call them ‘mangetoute’ which means ‘eat all’. The fabulous thing about snow peas and their close relatives, the snap peas is that they are eaten pod and all. Even the flowers and young shoots are edible. And then, if we use what’s left for compost or mulch, it feeds our soil; as with all legumes, snow peas convert nitrogen from the air into nitrogen in the soil.
Snow peas, snap peas and ordinary peas are all varieties of the same plant species, Pisum sativum. The difference is in their pods. When eaten young, the pods of snow peas and snap peas lack the tough fibrous layer that lines the walls of a normal pea pod.Snow peas have flat pods while snap peas, or ‘sugar snaps’ have fatter, more rounded pods.
Both grow best in cooler weather. They can be planted in autumn or winter in warm climates, otherwise in early spring as soon as the danger of a frost is passed. While more cold tolerant than other vegetables, the young seedlings will suffer in harsh frost. Generally snow peas are more heat tolerant than other peas. Plant in full sun, or half-day sun as the weather gets warmer.
Whether you are growing them in the garden soil or a large container filled with planting mix, plant seeds into their permanent position. For tall and climbing varieties put stakes in place before you sow, so that you don’t damage the roots once they are growing. Alternatively, plant them along a trellis or fence with wires or netting for support. Add fertiliser at planting time (slow release fertiliser or sheep pellets) and feed regularly with liquid fertiliser once the plants are growing.
Sow seeds in batches every few weeks for a continuous supply. Protect the young seedlings from slugs and snails.
For more information about snow peas and snap peas go to www.yates.co.nz
Strawberries
What could be sweeter than strawberries you grew in your own garden Strawberry plants take up little space. They grow easily in containers and fruit very soon after planting.
Containers make gardening easy at this time of year and plants will thrive in well drained potting soil, provided they are generously fed and never allowed to dry out. Otherwise plant them in well-drained garden soil and mulch with weed mat or straw to keep moisture in, weeds out and your berries shiny and clean. To avoid root disease, refrain from planting new crops in soil previously used for strawberries. Healthy plants will fruit for up to four years if you remove the runners after harvest, but best results come from planting new plants every two years.
Strawberries need lots of sun and lots of feeding. Add a handful of general garden fertiliser for each plant. For strawberries growing in pots, add slow release fertiliser at planting time, then liquid feed every fortnight, weekly once flowering begins. A good potting mix for strawberries is one part compost to two parts container mix. Seaweed sprays applied fortnightly are a good source of trace elements and help prevent fungal diseases.
Water regularly, especially when the berries appear and the weather warms up. A drip irrigation system works well as it keeps water off the fruit.
Protect your strawberries from the birds with bird netting over a wire frame. Snails can also be a problem. Instead of snail bait you could sprinkle a layer of grit over polythene.
3-Sep-2012

Digging new potatoes

Potatoes in a tub

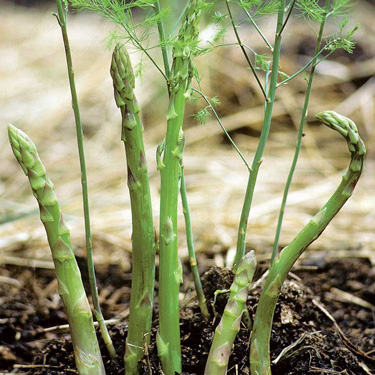
Asparagus

Strawberry


